
Kitesurfing is one of the fastest growing watersports in the world, and for good reason — it’s exhilarating, surprisingly quick to learn and above all, really fun. Whether you’re riding flat-water lagoons or ocean swells, the feeling of being powered across the water by nothing but a kite and the wind is genuinely addictive.
5-STEP GUIDE | GEAR | LEARN IN FRANCE | SAFETY | COST | FAQ
The initial learning curve can feel steep, but with the right preparation you’ll transition from total beginner to confidently gliding across the water faster than you’d think. The key lies in using the right gear — a suitable kite, board and harness — choosing the right location, and learning from a qualified instructor. With a bit of groundwork before your first lesson, you’ll be up and riding in no time.
Follow this 5-step guide to fast-track your kitesurf progression. You’ll save money on the extra lessons you don’t need and you’ll take the frustration out of the early stages of the learning phase.
Step 1: Learn to Fly a Trainer Kite
A trainer kite is a small 2 to 3 metre traction kite that will allow you to safely learn the basics of kite flying before you hit the water. Typically, a trainer kite will be smooth and stable to fly with predictable response and power to ensure easy progression into all kite sports. It’s an excellent way to learn about the wind window and the power zone, which you need to understand for kitesurfing.
Traction kites generally have 2 or 4 lines, but 3-line models do exist. A 3 m² kite is ideal, but take care in very strong winds as even this small size can drag you along or even lift you off your feet.
HQ Symphony Beach Sport 2.2
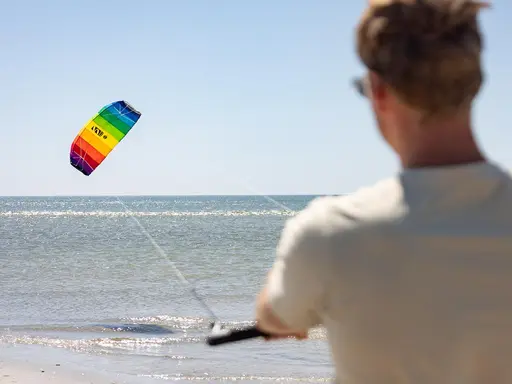
If you master your basic kite skills on a trainer kite before your kitesurfing lessons, you’ll save loads of time and money, and you can always use it later for mountain boarding or snow kiting, or lend it to friends when you’re out on the water!
Step 2: Dig Out Your Old Skateboard
There’s a huge amount of crossover in boardsports and getting good at sports like wakeboarding, skateboarding, surfing and snowboarding will mean that you’ll be instantly more at ease on your kiteboard. The advantage of being comfortable with the board is that you can focus on flying the kite rather than keeping your balance on the board. Wakeboarding is without doubt the closest sport to kitesurfing as the board is very similar. So, get down your nearest cable-ski centre and get comfortable riding a wakeboard. It’s a sure-fire way to fast track your progression during your kitesurfing lessons.
Step 3: Watch Some Instructional Videos
Watch as many videos on learning to kitesurf as you can. They’ll help you progress much faster when you come to take lessons. There are loads of great videos out there that teach you the basics. I can recommend the instructional kitesurfing series from Progression which take you from beginner to professional in 5 videos available on DVD or digital download. Otherwise check out YouTube and it doesn’t do any harm to watch a few different clips on the same subject. Remember, videos are never intended to be used as a substitute for professional kiteboarding instruction.
The series of videos from Progression Sports aim to get you up to speed before your lessons or refresh your memory of everything you’ve learned under instruction.
Step 4: Get Kitesurfing Lessons From a Qualified Instructor
Don’t miss this step! Getting lessons from a qualified kitesurf instructor is undoubtedly the best way to progress quickly and safely. The good news is that if you’ve given yourself a head start by following the first 3 steps in this guide, you’ll cut down the teaching time dramatically.
Typically, a 3-day, 4 hour per day course should see you up and riding with confidence. An instructor will correct mistakes quickly and stop bad habits from forming.
Kitesurfing lessons are typically broken down into learning stages to help you progress and develop the skills and knowledge to safely enjoy the sport:
Introduction and Equipment Setup
The first step is to introduce you to the kitesurfing equipment, including the kite itself, control bar, lines, harness, and board. Your kitesurf instructor will explain the purpose of each component and demonstrate how to properly set up and inspect your gear. There’ll be an emphasis on safety protocols, such as checking the lines for knots and tangles, and ensuring the harness is fitted correctly.
Beach Piloting and Safety Precautions
Before taking to the water, beginners are taught the fundamentals of controlling the kite on the beach. This involves learning about the wind window and how to safely launch and land the kite. Once you have the kite overhead in the neutral position (12 o’clock), you’ll learn how to move the kite around and dip it in and out of the power zone. Your aim here is to learn to fly the kite in a controlled figure of eight motion. Safety precautions, such as maintaining a safe distance from other beachgoers and understanding wind conditions, are also covered. Once you can comfortably launch and land the kite and control it through a figure of eight, you’re ready to get on the water.
Kite Control and Body Dragging
With a basic understanding of kite control, you’ll move onto flying the kite in shallow water and practice generating power from the kite. By dipping the kite in and out of the power zone, you’ll soon start getting a feel for the power, and control it to drag yourself through the water. Eventually, you’ll be able to body-drag upwind. This body-dragging stage is a critical step, which you’ll use throughout your progression.
Water Re-Launch and Self-Rescue
On occasion, you’ll lose control of your kite and it will crash into the water. Being able to re-launch the kite is an essential skill to master. You’ll learn to manipulate the kite to guide the leading edge out of the water and to the edge of the wind window. Then, with a tweak on the control bar and a bit of finesse, you can get the kite airborne again.
In cases where the kite cannot be re-launched due to tangled lines or other issues, knowing self-rescue techniques is crucial. These techniques involve using your kite as a floatation device and performing controlled body drags to retrieve your board and return to shore safely.
Introduction to the Board
As you become better at controlling the kite on the water, you’ll start to incorporate the board. You’ll learn how to position the board under your feet with the kite in a neutral position directly overhead. In this position you’re ready to attempt your first water start.
Water Start and First Board Ride
Once you’ve gained confidence in body dragging and you’re comfortable with the board, you’re ready for your first ride. Your instructor will guide you through the process of getting on the board, using the kite’s power to control speed, and maintaining balance while riding on the water’s surface. This phase marks a significant milestone in the learning process and is an exciting moment for learners.
Riding and Staying Upwind
Riding and mastering the technique of staying upwind mark the transition from basic skills to a more advanced phase of kitesurfing. Riding involves coordinating the control of the kite and the board to glide smoothly on the water’s surface. You’ll learn to ride straight across the wind and switch direction to come back more or less to your starting point. As you gain proficiency, the focus shifts to staying upwind, a skill that allows you to explore the open water and fully enjoy the freedom of the sport. You’ll learn to get the kite in the right position and adjust your body position on the board so the rail tracks upwind. The ability to stay upwind not only enhances your overall enjoyment of kitesurfing but also opens up the opportunity to explore new spots.
Kitesurfing is an extreme sport and can be dangerous if it’s not given the respect it deserves. A 12 m kite accidentally pitched into the power zone can, if you’re not familiar with the kite’s safety system, end with you being dragged up the beach, or worse. Even if you think you can learn on your own, teaching yourself will never replace the benefit of getting lessons. Plus, kite schools have access to loads of gear that will allow you to use a kite perfectly adapted to the spot, the day’s conditions, and your skill level.
Be safe, have fun and find a kite school near your spot.
Step 5: Buy Kitesurfing Gear Adapted to Your Level
When you start out you’ll crash the kite — everybody does. Master your kite flying skills on a trainer kite as they’re a bit tougher and don’t have an inflatable leading edge.
Then you’ll be using the kitesurf school’s gear and it’s likely to get a good thrashing, which is a good reason for getting lessons before you invest in your own gear.
After your lessons, ask your school if they have any second hand gear for sale. They’ll often give you a good deal if you’ve done your course with them. In any case when you’re new to the sport it’s almost pointless buying brand new kit, it’ll just get trashed…
The smart progression path is: lessons with school gear, then a solid second-hand setup to consolidate your skills, then new gear once you know exactly what you want. Many kite schools sell off end-of-season stock at a significant discount — often 30–50% off — so it’s worth asking.
What Gear Do You Need to Kitesurf?
A complete kitesurfing setup includes a kite, control bar with lines, a harness, and a board. Here’s what you need to know about each component as a beginner.
Kites
Modern kites fall into two main categories: inflatable leading edge (LEI) kites and foil kites. As a beginner, you want an LEI kite — they’re easier to relaunch from the water and offer more predictable, forgiving flight. Within LEI kites, the most common shapes are “bow” and “delta” designs, both of which are excellent for beginners. Don’t worry about C-kites or specialist designs until you’re well past the learning phase.
Kite sizes are measured in square metres and typically range from 5 m² to 17 m². The size you need depends on your weight and the wind strength — lighter riders and stronger winds need smaller kites, and vice versa. Most beginners start with a kite between 9 and 12 m². Your instructor will help you work out the right size for your weight and local conditions. If you’re building a two-kite quiver, aim for about 3 m² between sizes — for example, a 12 m² and a 9 m² — to cover the widest wind range.
Boards
The standard beginner board is a twin-tip — a symmetrical, bi-directional board that lets you ride in both directions without switching your feet. Twin-tips are versatile, forgiving and the go-to choice for learning. Start with a larger board (around 140–145 cm) for more stability and easier water starts, then size down as you improve. Once you’re comfortable, you might explore directional surfboards for wave riding or hydrofoil boards — but that’s a conversation for later.
Harnesses
There are two types: seat harnesses and waist harnesses. Most schools use seat harnesses for beginners because they sit lower on your body, don’t ride up under load, and distribute the kite’s pull more comfortably while you’re still learning. Once you’ve got the basics down and you’re riding upwind consistently, many riders switch to a waist harness for greater freedom of movement. If you’re buying your first harness and plan to progress quickly, a waist harness is the better long-term investment.
Wetsuits and Protection
You’ll need a wetsuit for most kitesurfing in France. On the Mediterranean in summer, a 3/2 mm suit is usually enough. For the Atlantic coast or spring/autumn sessions, you’ll want a 4/3 mm or even a 5/4 mm suit with boots. A helmet is strongly recommended for beginners, and a buoyancy aid adds an extra safety margin while you’re still finding your feet. A changing robe makes getting changed at windy beach car parks considerably more dignified.
Best Places to Learn Kitesurfing in France
France has some of Europe’s best spots for learning to kitesurf — and crucially, a range of conditions to suit different stages of your progression. The south of France in particular offers reliable wind, warm water, and a concentration of excellent kite schools. Here are the standout beginner-friendly spots.
Leucate — La Franqui
Leucate is one of France’s top kitesurfing destinations and an ideal place to learn. The Tramontane wind blows side-shore and is remarkably consistent — it’s not unusual to get rideable wind 20+ days a month in summer. The shallow lagoon behind the beach offers flat, waist-deep water that’s perfect for body dragging and first water starts, while the open sea side gives you waves to progress into later. Multiple IKO and FFVL-affiliated schools operate here from April to October.
Almanarre — Hyères
Almanarre on the Côte d’Azur is a long, sandy beach with a shallow salt flat behind it — another spot where you get the best of both worlds. The Mistral wind provides reliable power, and the sheer number of kiters on the water means there’s a strong community and plenty of schools to choose from. Hyères itself is a lovely town with good restaurants, making it a great base for a kite holiday.
Lac de Serre-Ponçon
If you’d rather learn on fresh water surrounded by mountains, Lac de Serre-Ponçon in the southern Alps is a brilliant option. The lake offers flat water and thermal winds that build reliably through the afternoon. It’s also a fantastic multi-activity destination — you can combine kite lessons with hiking, mountain biking and rafting in the surrounding valleys.
Le Jaï — Étang de Berre
Le Jaï on the Étang de Berre near Marseille is a flat-water paradise powered by the Mistral. The shallow lagoon and sandy bottom make it very forgiving for beginners, though the wind can be strong — which is why it’s also a magnet for experienced freestyle riders. If you can learn to kite here in a proper Mistral, you’ll be able to kite just about anywhere.
For the full lowdown on every spot, check our complete guide to kitesurfing in the south of France.
Kitesurfing Safety, Insurance & Regulations
Kitesurfing is inherently safe when practised correctly, but it demands respect. A kite is a serious piece of equipment — even a small one can generate enough power to drag you across a beach or lift you off your feet. Here are the key safety considerations.
Insurance
Third-party liability insurance is strongly recommended. If you accidentally crash into another kiter, their gear, or a beachgoer, you could be liable for significant damages. In France, the FFVL (Fédération Française de Vol Libre) licence includes third-party liability insurance and is required at many organised spots. An FFVL licence is inexpensive and well worth having if you’re kitesurfing in France regularly. Some kite schools include temporary FFVL cover as part of their course fees — ask before you book.
Right of Way and Etiquette
Basic right-of-way rules: the rider on starboard tack (right hand forward) has priority. When two kiters are riding towards each other, the upwind rider keeps their kite high and the downwind rider keeps theirs low to avoid tangling lines. Always maintain a safe distance from other beach users, swimmers and obstacles. Launch and land with a buddy, never alone.
Weather and Wind
Check the forecast before every session. Windguru and Windfinder are the go-to apps for kite-specific wind forecasts. As a beginner, look for steady winds between 12 and 20 knots — gusty or offshore winds are best avoided until you’re more experienced. Never kite in an offshore wind unless you have a safety boat or are very confident in your self-rescue skills. Thunderstorms are an absolute no-go — get off the water immediately if you see lightning or hear thunder.
Choosing a School
Kitesurfing instruction is internationally regulated by the IKO (International Kiteboarding Organisation). In France, the FFVL also certifies schools and instructors. Any school affiliated with either body must carry insurance and meet strict teaching standards. Look for the IKO or FFVL logo on the school’s website or at their base. You can verify instructors on the IKO website. Don’t be afraid to visit a couple of schools in person before committing — a good instructor makes an enormous difference to your progression.
How Much Does Kitesurfing Cost?
Let’s break down the real costs so there are no surprises.
Lessons: A 3-day beginner course (around 4 hours per day) typically costs 300–400 EUR in France, including all equipment. Private lessons are more expensive but you’ll progress faster — expect 80–120 EUR per hour.
New gear (full setup): A complete new setup — kite, bar and lines, harness, and board — runs between 1,800 and 2,800 EUR depending on the brand. Previous season’s models often come with 30–40% discounts, which is the smart way to buy new.
Second-hand gear: A solid used setup can be found for 600–1,000 EUR. The key is knowing the kite’s age — gear from the last 2–3 years is usually excellent, but kites older than 5 years may lack modern safety features like reliable de-power and easy relaunch. Ask your instructor for guidance before buying used.
Wetsuit and accessories: Budget 200–350 EUR for a good wetsuit, neoprene boots, a helmet, and a buoyancy aid. You may already own some of this if you surf or do other watersports.
FFVL licence: Around 40–50 EUR per year for third-party insurance — essential if you’re riding in France.
All in, you can be up and running with lessons and your own second-hand gear for around 1,000–1,500 EUR — less than the cost of a week’s ski holiday.
Extra Tip: Learn Somewhere Similar to Your Local Spot
The following tips have been provided by Tantrum Kitesurf:
Are you trying to choose between the hundreds of different schools and different locations all offering perfect wind, the best kit and super short training times. How can you possibly find the course that’s best for you?
Firstly, ask yourself the question, where are you going to be kitesurfing 90% of the time?
Of course all of us would love to be dashing off to remote, exotic locations with perfect wind and Pina Colada’s on tap every other week. The reality for most of us is somewhat different, and we find ourselves having to kitesurf wherever our nearest accessible bit of water happens to be.
Often this location won’t be glass flat, with a perfect 25 knots blowing over the top of it. Realising this, my advice would be to learn somewhere with similar conditions to where you are going to kite on a regular basis. If you learn on a flat, waist deep lagoon, sure your time under instruction will be shortened, however will you still be able to do everything you were doing out there when you return to the dumping shore break and choppy conditions of your local spot… I would say not.
This can lead to huge amounts of frustration and leads many to give up before they’ve even started. Of course if your local spot is a flat, waist deep lagoon then perfect, but then why would you take kitesurfing lessons anywhere else?!
Following these simple guidelines you can start to narrow down the field and hopefully pick a place to take your kitesurfing lessons that sees you not only learning safely, quickly and enjoyably but that also gives you the greatest chance of progressing when you get back home.
FAQ
You can be up and riding with confidence in 3 days. Kitesurfing is one of those rare sports that’s actually a lot easier than it looks. If you’ve flown a power kite and you’ve had a go at skateboarding, snowboarding or wakeboarding, you’re already more than halfway there. Typically, a 3-day, 4 hour per day course should see you up and riding. You’ll then need to get as much practice as possible to consolidate your skills and get comfortable riding upwind. The ability to ride upwind means you can stay out of trouble, avoid hazards and get back to where you started.
Contrary to popular belief, you don’t need to be super-fit to kitesurf. You’ll often see little 10 year old kids out on the water. Girls especially shouldn’t be put off by the preconception that you need massive biceps. It’s simply not true — with the right kite nearly everyone can kitesurf. It’s not really your arms that take the strain — the pull of the kite goes through your harness, so it’s your core that gets the workout. Having said that, you need to be comfortable in the water and you do need a reasonable level of fitness.
A 3-day beginner course in France costs around 300–400 EUR including equipment. If you then buy a complete second-hand setup (kite, bar, harness and board), expect to pay 600–1,000 EUR. A new setup runs 1,800–2,800 EUR depending on the brand. On top of that you’ll need a wetsuit (150–250 EUR), plus a helmet, buoyancy aid and neoprene boots (50–100 EUR). All in, you can be kitesurfing independently with your own gear for around 1,000–1,500 EUR.
No — and you shouldn’t try. Kitesurfing involves powerful equipment in a constantly changing environment, and without proper instruction you’re a danger to yourself and everyone else on the beach and in the water. A qualified instructor will teach you essential safety procedures, self-rescue techniques, right-of-way rules, and the correct way to set up and de-power your kite. No amount of YouTube videos can replace that. Invest in a proper course — it’s the single best investment you’ll make in the sport.
Kitesurfing actually has a faster learning curve than traditional surfing. Most people can ride a kiteboard across the wind within 3 days of lessons, whereas surfing to a comparable level — consistently catching and riding waves — takes considerably longer. The kite provides the power, so you don’t need to paddle or wait for waves. That said, the kite adds a whole extra dimension of skill (you’re essentially flying and riding simultaneously), and mastering advanced techniques takes just as long as in any other sport.
There’s no strict minimum age, but most schools recommend children be at least 30 kg (about 65 lbs) so they can hold their ground against the kite’s pull. Many kids start at around 10–12 years old. At the other end of the scale, there’s no upper age limit — kitesurfing is practised and enjoyed by people well into their 60s and beyond. The harness takes most of the strain, so it’s less physically demanding than it looks.
Third-party liability insurance is strongly recommended and is required at many regulated spots in France. The easiest way to get covered is through an FFVL (Fédération Française de Vol Libre) licence, which costs around 40–50 EUR per year and includes civil liability insurance. Many French kite schools include temporary FFVL cover in their lesson packages. If you’re visiting from the UK, check whether your travel insurance covers kitesurfing — many standard policies exclude it as a ‘hazardous sport’.
The right kite size depends on your body weight and the typical wind strength at your local spot. As a rough guide: riders under 65 kg usually start with a 9–10 m² kite, 65–80 kg riders with an 11–12 m², and riders over 80 kg with a 12–14 m². These sizes assume moderate wind (15–20 knots). Your instructor will help you determine the best size for your weight and conditions. If you’re buying your first kite, start with the larger size in your planned quiver — it lets you ride in lighter, more manageable winds.
Please leave a comment below if you need any more advice on learning to kitesurf, or if you have anything to add to help improve this guide. Have fun learning!
Hi,
My brother started kitesurfing recently. He’s 50. where can I find second hand gear to offer him? Thanks
Hi Sara, thanks for your comment!
I’ve found that one of the best places to look for second hand kitesurf gear is Facebook Marketplace. Or, of course there’s eBay or your local small ads site such as Gumtree in the UK. Good luck and hope that helps!
Hi, Thanks for the info!
I am heading to Cabarete, Dominican Republic at the end of the month for four months! I can’t wait to learn kiteboarding! I’ve been dreaming, planning and training for this moment! 😀